VenueMagic 4.x Features

Experience the next evolution in show control with VenueMagic 4.0! Packed with innovative features and powerful enhancements, this release is designed to help you create more immersive, flexible, and dynamic productions than ever before. From breathtaking 3D audio and multi-monitor video playback to smarter event automation and seamless networking, VenueMagic 4.0 puts creative control at your fingertips.

Whether you’re a seasoned VenueMagic user or just getting started, you’ll find new tools and thoughtful improvements—many inspired by your feedback—that make designing and running your shows easier, faster, and more exciting. Explore the highlights below and see how VenueMagic 4.0 can elevate your next production!

Immersive Audio

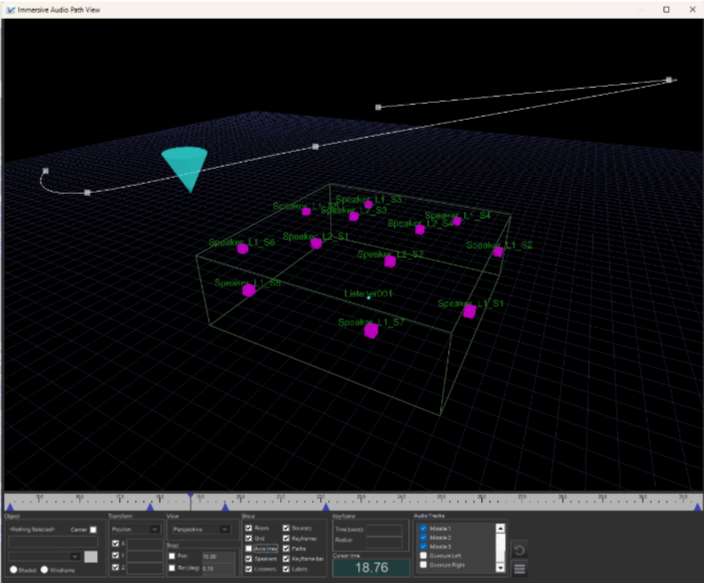
VenueMagic 4.0 now brings your shows to life with immersive audio technology. Easily create stunning 3D soundscapes that move and surround your audience, using advanced speaker layouts and real-time spatial positioning. With intuitive controls and flexible configuration, VenueMagic’s immersive audio lets you deliver unforgettable experiences—whether you’re designing for theaters, attractions, or live events. Available in VenueMagic SC+ and above only.


Improved Audio Output Channel Control

VenueMagic 4.0 introduces the powerful new Audio Output Window, giving you complete control over every audio channel in your show. Instantly view real-time audio levels, mute or solo individual channels, and test speakers with static playback—all from a single, intuitive interface. Effortlessly adjust audio effects and bypass sound effects with one click. Organize your outputs with customizable tabs and groups, making setup and management easier than ever. Experience streamlined audio control and enhanced flexibility with VenueMagic 4.0!  Available only in VenueMagic DMX+AV and above.


Parametric Equalizer

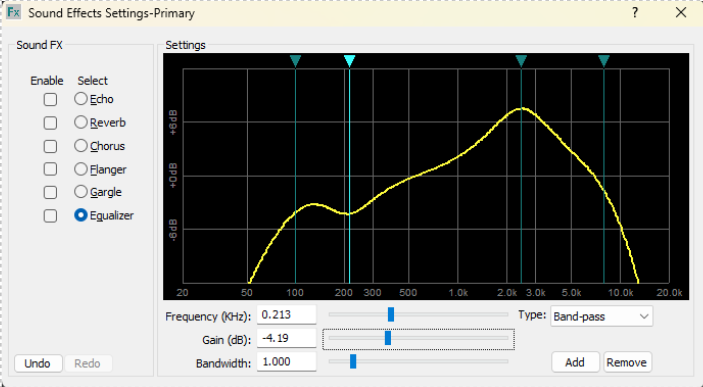
Fine-tune your sound with VenueMagic 4.0’s new Parametric Equalizer! Available for both audio output channels and individual audio clips, this intuitive tool lets you sculpt your audio with precision. Easily adjust high-pass, low-pass, and band-pass filters, add or remove handles, and control frequency, gain, and bandwidth—all in real time. Instantly hear the results as you shape your mix, reduce unwanted noise, and enhance clarity. VenueMagic’s Parametric Equalizer puts professional-grade audio control at your fingertips! Available only in VenueMagic DMX+AV and above.


Randomized Events & Timeline Playback

VenueMagic 4.0 gives you new creative control over how events and timelines play back in your shows. Easily set up sequences where actions can happen all at once, one after another, or in a random or shuffled order—adding variety and excitement to every performance. You can even trigger specific actions based on external inputs, making your shows more interactive and dynamic. With these powerful new options, VenueMagic 4.0 makes it simple to design engaging, unpredictable experiences that keep your audience captivated!  Available in VenueMagic SC+ and above only.


Built-in Keycode Combination Function

VenueMagic 4.0 now features a powerful built-in keycode system, making it easy to add password, combination lock, and access control functionality to your shows. Assign custom codes to trigger specific actions, unlock special effects, or control access to restricted areas—all without external hardware or complex programming. Perfect for escape rooms, interactive exhibits, and secure show operations, VenueMagic’s keycode function lets you create engaging, puzzle-based experiences with just a few clicks. Available in VenueMagic SC+ and above only.

Play Up to 4 Videos at a Time

VenueMagic 4.0 now lets you play up to four* videos simultaneously across four different monitors—perfect for creating immersive, multi-screen experiences. Previously limited to a single video, you can now deliver dynamic visuals and content to multiple displays, all with the power and flexibility of VenueMagic’s show control platform. (*VenueMagic DMX+AV is limited to two simultaneous videos)

Improvements to VMNet

VenueMagic’s VMNet (VenueMagic Network) expands your show control capabilities by allowing multiple computers running different VenueMagic projects to communicate and share resources over a local network. With VMNet, you can remotely run and synchronize timelines, execute events, and share I/O between systems—making it easy to coordinate complex, distributed shows. This powerful networking feature increases scalability, letting you grow your production by simply adding more VenueMagic installations (each requiring its own license). Experience seamless collaboration and greater flexibility with the improved VMNet in VenueMagic 4.0! Available in VenueMagic SC+ and above only.

Little Features that Matter

This section is for our dedicated VenueMagic aficionados whose feedback and special requests help shape every release. While not every new or requested feature is listed here, VenueMagic 4.0 delivers a host of technical enhancements designed to streamline your workflow, improve integration, and give you even greater control over every aspect of your show.   

Audio                                                                                                              

Track Master Volume External Control

Allows you to control the master volume of individual audio tracks using external devices or automation in addition to the track slider, enabling real-time adjustments during playback. SC+ Edition only.

Global Audio FX Tails

Ensures that audio effects such as reverb or delay continue to play out naturally (the "tail") even after the source audio stops, providing smoother transitions and a more professional sound.

Send All Audio to Primary

Offers a quick option to route all audio outputs to the primary audio device, simplifying setup and troubleshooting when you want all sound to play from a single source.

Multi-Audio Output

Supports simultaneous playback of the same audio clip through multiple audio output devices on a single track, making it easy to create complex soundscapes or direct different audio tracks to different speakers or zones.

Set Video Playback Audio Channel

Choose which audio channel is used for video playback, giving you more control over your show’s sound.

Audio Clip Effects Exported to ShowNodes

When exporting your show, any effects applied to individual audio clips are now included in the ShowNodes, ensuring your sound design is preserved across different projects or systems. VenueMagic SC+ and above only.

Copy/Paste Audio Clip Effects

Copy just the audio effects from one clip and paste them onto another, streamlining your workflow and making it easy to apply consistent processing across multiple clips.

Events                                                                                                             

Event Condition Expressions

Create complex event triggers using flexible condition expressions, allowing you to combine multiple criteria for precise control over when events occur. VenueMagic SC+ and above only.


Value Changed Condition Events

Trigger events automatically when a monitored value or variable changes by a specified amount (rather than to a specific value), enabling responsive and dynamic show behaviors.

Copy/Paste Events

Easily duplicate events and their settings between different parts of your project, streamlining workflow and saving setup time.

Trigger Probability Setting in Events

VenueMagic 4.0 lets you add a touch of chance to your shows with the new trigger probability setting for events. Want an event to always happen? Set its probability to 100%—it will trigger every time the conditions are met. Prefer a little suspense? Try 50% and watch your event fire about half the time, keeping your audience guessing! With this feature, you can easily add more randomness and excitement to your productions.

Initialize Trigger State for Events

Set the initial state of event triggers at the start of your show, ensuring consistent and predictable event behavior every time.

Variable Table                                                                                               

Persistent Variables

Persistent Variables Keep your show’s state intact between sessions! With VenueMagic 4.0, variables in the Variable Table can be set as persistent, meaning their values are saved in your project file. This makes it easy to track progress, scores, or any other important data—even after closing and reopening VenueMagic.

Set Variable to External Input Value

Make your shows more interactive and dynamic! Now you can set a variable’s value directly from an external input or another variable, not just a fixed number. Snapshot dynamic variables and external inputs for later use.

VenueMagic 3.5 Released

VenueMagic-The Show Control Solution

The much-awaited release of VenueMagic 3.5 is here!

The most powerful and comprehensive show control software in the world just got better. For over 10 years, VenueMagic's unique graphical timeline-based approach to show control has set the standard for sophistication and ease-of-use in the show control world.  Now VenueMagic takes another leap forward with some exciting new features.
VenueMagic Screens

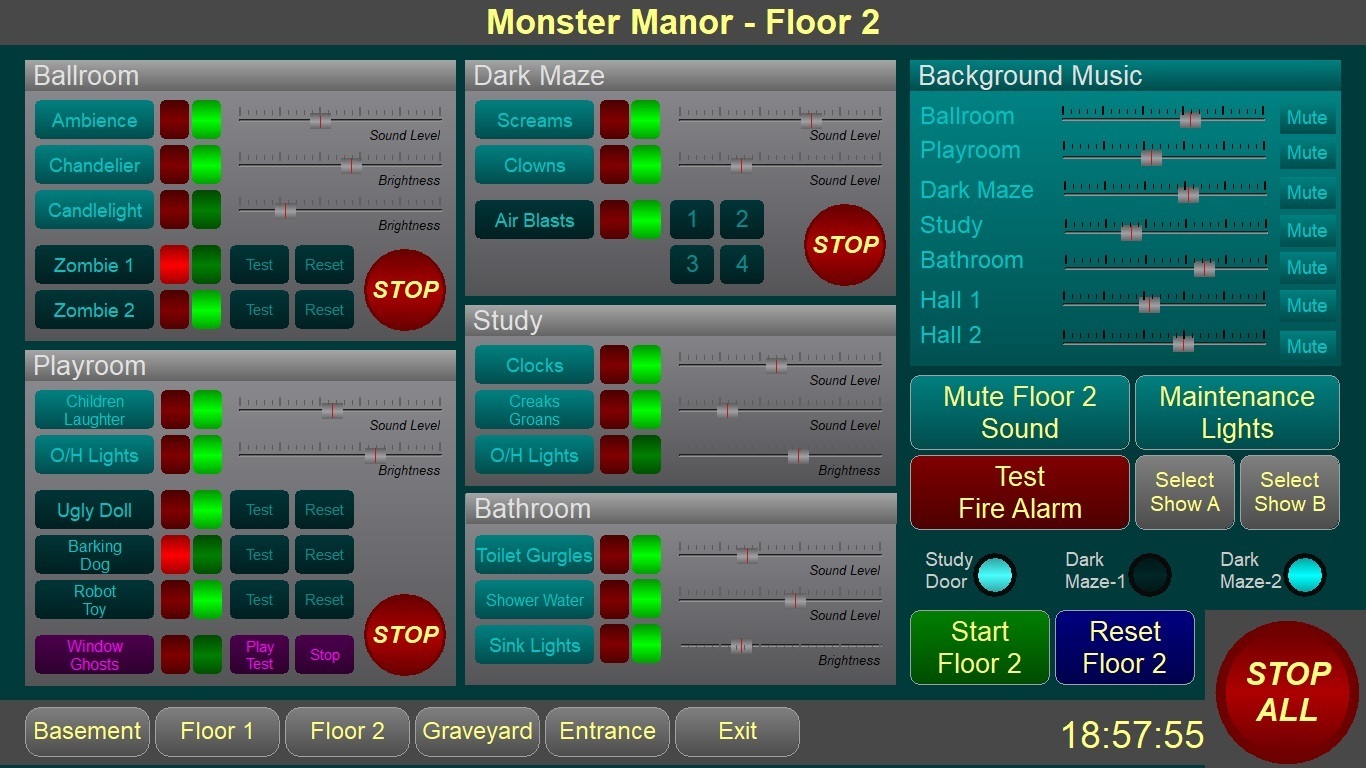
VenueMagic now includes a full-featured graphical user interface development tool. Create your own operator control panels by dragging and dropping buttons, sliders, lamps, numerical displays, images and more.  Great for theater/live performances, haunted attractions, escape rooms and many other venues.  VenueMagic Screens is available in VenueMagic SC+ and SC2+ Editions.  Click here for more information.

Custom User Interface
Custom Escape Room Puzzle
ASIO Audio Interface
VenueMagic now supports audio hardware that use ASIO.  This includes a wide variety of pro-audio interfaces such as Dante®, MOTU®, Allen & Heath® and others.  Tested to over 200 tracks of up to 24-bit audio spread across 64 channels (via Dante Virtual Soundcard) for certain applications.  ASIO is available in VenueMagic DMX+AV, DMX2+AV, SC+ and SC2+ editions.
MOTU 24ao
New Animatronics Features
VenueMagic already gives you animatronics programming features that are second to none.  We've just added a few more features to push the envelope even further. 

Complex Coordinated Movements
Now you can control multiple animatronics movements in a coordinated fashion using a single input. For example, suppose you have a sophisticated animatronics head that requires the coordination of several channels to produce a smile.  You can use VenueMagic's graphical editor to program the smile movement and then assign that movement to a slider, or other input device.  Move the slider and all of the channels work together to form the smile. This feature is available in VenueMagic SC+ and SC2+ editions.

More Precise Channel Calibration
The improved Fixture Calibration window gives you more precise control for setting min and max ranges of movement, scaling and acceleration limits.  The Fixture Calibration window is available in VenueMagic Classic and above.
Try VenueMagic 3.5 Today!
If you already own VenueMagic, you can download and install Version 3.5 as a free upgrade.  If you're interested in knowing more about VenueMagic, please click here for information and to get your free 15-day trial!  

Any questions? Please contact us at support@venuemagic.com.

Inside Haunted House Technology


In a recent interview with Commercial Integrator Magazine, Don Nolan, CEO of Entertainment Sciences Group, discusses how recent advances in show control and AV technologies have impacted the haunted house and escape room industries.  Read the complete article here.

Upgrade Online

Hello VenueMagic Fans!

We are excited to announce that you can now get your upgrade to VenueMagic 3.0 online!
Under the Purchase Menu, Select Upgrade.

Show Nodes v2 Hardware Information and Instructions

Components

  • Raspberry Pi 2 Model B or Raspberry Pi 3 Model B (www.raspberrypi.org)
  • PiFace Digital 2 Revision 2 (piface.org.uk)
  • SanDisk MicroUSB Card 16gb

Recommended Power Supplies

Primary evaluation criteria – Must supply at least 2 Amps of +5v to the Raspberry Pi and the appropriate voltage needs for your props.  We typically use the 24V version and use a step down converter as necessary for 12V props.

  • 24/5V Version – PSS0524-100 – RHINO switching power supply, 24 VDC (adjustable), 5 VDC output, 100W, 120/240 VAC or 125-375 VDC nominal input, 1-phase, aluminum housing, screw terminals.
  • 12/5V Version – RT-125A – 131 Watt AC to DC Triple Output Power Supply +5V/12A +12V/5.5A -5V/1A No longer recommended because it requires a minimum level of amperage pull to turn on.

Additional options for power include getting a single voltage power supply and down-converting to 5V for the Raspberry Pi or even just getting a separate power supply for both voltages. You need to make sure your down-converter can handle at least 2 amps.

I have used the following step-down converters:

And power supplies at 12 volt:

PiFace Digital 2 Jumpers

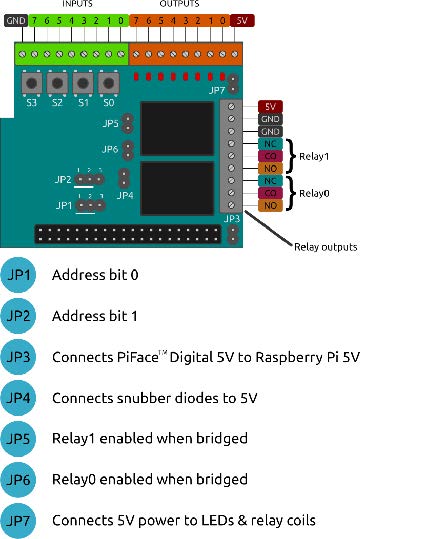
The PiFace Digital 2 is delivered with all jumpers in place.  This allows both us to test prior to shipping and you to test and and learn prior to placing into service. Normally we setup the PiFace to supply the primary power to the Raspberry Pi and Inputs. Jumper 3 determines whether when the power is supplied to PiFace Power Inputs. This jumper (Jumper 3) is very important, it literally means you can only plug in power to either the Raspberry Pi USB power port OR the PiFace. Connecting power to both the 5V in on the PiFace and the Raspberry Pi can easily cause an electrical problem and blow out one or both of the boards. This will be corrected in V3 of the ShowNodes hardware.

Once you get ready to place the unit into service and hook up something other than 5V, you will need to change the Jumpers. As soon as you move higher than 5V you will need to remove Jumper 4 (JP4). This Jumper connects a snubber diodes to prevent back voltage from the Outputs. Just remember, more than 5V remove Jumper 4 (JP4).

If you are not using the Relay 0 or Relay 1 you can disconnect them by removing either JP6 for Relay 0 or JP5 for Relay 1. We would also suggest removing JP7 if you are not using the relays. This jumper is for providing the power for lighting the LEDs and turning on/off the relays.

Our normal production setup of the jumpers is to have JP1 and JP2 on pins 1/2. JP4, JP5, JP6, and JP7 removed. This allows us to use multiple DC voltage levels on the outputs and doesn’t have the relays clicking for the first two outputs.

Wiring

Output

If using one of our recommended power supplies, you will run +5 volts to the +5 terminal in the black terminal connector of the PiFace. Run the 5V ground to one of the two GND terminals next to it. DO NOT connect USB power to the Raspberry Pi power port. To connect 24/12V Pneumatic Valves or other 24/12V props, connect the positive side of the power supply terminal to the positive side of the valve and then connect the negative side of the valve to the Output on the PiFace in this manner:


Diode Standard 1000V (1kV) 1A Through Hole DO-41


Input

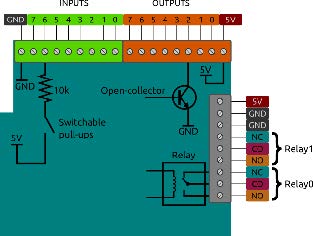
The input terminals are basic contact closure inputs not for power driving inputs. They are internally pulled up to approximately 4.5 volts. To connect a standard switch you can simply connect one wire to the input pin and the other wire to the ground. To connect sensors and other non-5 volt input devices, you will need a Voltage Divider or Opto-Isolator circuit.

Don’t Be a Monster

We are donating a VenueMagic DMX+AV 3.0 to the Don’t Be A Monster Auction at Transworld this year. It will be on auction at booth 1907 from start of show on Thursday to Saturday at 5pm

You can see us at Booth 1536

It’ll be a great show this year. Don’t miss it!

#Dontbeamonster

How do I control RGB color for Fixture Effects?

To control the RGB color in a fixture effect you need an RGB Fixture that contains a dimmer channel.

You will need to create two Control Tracks. The first control track (Control Track A) is where you will set the color. The second control track (Control Track B) is where you will place the Fixture effect.

Control Track A:

  1. Go to the Fixtures folder in the project window
  2. Click on the expand (+) button to the left of your RGB fixture
  3. Inside the RGB fixture, you will find a group of Channels called “RGB
  4. Click and drag it onto Control Track A
  5. Next, Add a Level Control effect to the Control Track.
    Click on the link below for a review on how to setup RGB color in the Envelope Editor:
    https://youtu.be/lC0pKMyL7DA?list=PLbPdz-0QHwKnFC_cYWcYCpWSEYlbEXMk3
Control Track B
  1. Expand the fixture in the project window again and this time drag the Dimmer channel into Control Track B
  2. Now drag your desired Fixture effect on to Control Track B

Please submit any questions to support@venuemagic.com

1 2 3 11
>