Ben Holmes
Author Archives: Ben Holmes

Show Nodes v2 Hardware Information and Instructions

Components

  • Raspberry Pi 2 Model B or Raspberry Pi 3 Model B (www.raspberrypi.org)
  • PiFace Digital 2 Revision 2 (piface.org.uk)
  • SanDisk MicroUSB Card 16gb

Recommended Power Supplies

Primary evaluation criteria – Must supply at least 2 Amps of +5v to the Raspberry Pi and the appropriate voltage needs for your props.  We typically use the 24V version and use a step down converter as necessary for 12V props.

  • 24/5V Version – PSS0524-100 – RHINO switching power supply, 24 VDC (adjustable), 5 VDC output, 100W, 120/240 VAC or 125-375 VDC nominal input, 1-phase, aluminum housing, screw terminals.
  • 12/5V Version – RT-125A – 131 Watt AC to DC Triple Output Power Supply +5V/12A +12V/5.5A -5V/1A No longer recommended because it requires a minimum level of amperage pull to turn on.

Additional options for power include getting a single voltage power supply and down-converting to 5V for the Raspberry Pi or even just getting a separate power supply for both voltages. You need to make sure your down-converter can handle at least 2 amps.

I have used the following step-down converters:

And power supplies at 12 volt:

PiFace Digital 2 Jumpers

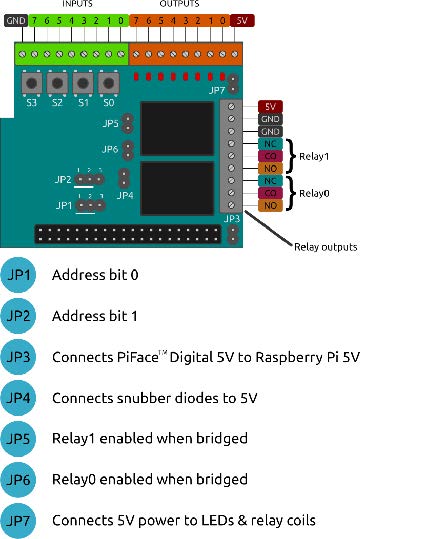
The PiFace Digital 2 is delivered with all jumpers in place.  This allows both us to test prior to shipping and you to test and and learn prior to placing into service. Normally we setup the PiFace to supply the primary power to the Raspberry Pi and Inputs. Jumper 3 determines whether when the power is supplied to PiFace Power Inputs. This jumper (Jumper 3) is very important, it literally means you can only plug in power to either the Raspberry Pi USB power port OR the PiFace. Connecting power to both the 5V in on the PiFace and the Raspberry Pi can easily cause an electrical problem and blow out one or both of the boards. This will be corrected in V3 of the ShowNodes hardware.

Once you get ready to place the unit into service and hook up something other than 5V, you will need to change the Jumpers. As soon as you move higher than 5V you will need to remove Jumper 4 (JP4). This Jumper connects a snubber diodes to prevent back voltage from the Outputs. Just remember, more than 5V remove Jumper 4 (JP4).

If you are not using the Relay 0 or Relay 1 you can disconnect them by removing either JP6 for Relay 0 or JP5 for Relay 1. We would also suggest removing JP7 if you are not using the relays. This jumper is for providing the power for lighting the LEDs and turning on/off the relays.

Our normal production setup of the jumpers is to have JP1 and JP2 on pins 1/2. JP4, JP5, JP6, and JP7 removed. This allows us to use multiple DC voltage levels on the outputs and doesn’t have the relays clicking for the first two outputs.

Wiring

Output

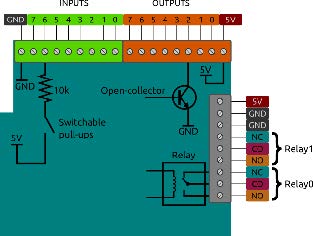
If using one of our recommended power supplies, you will run +5 volts to the +5 terminal in the black terminal connector of the PiFace. Run the 5V ground to one of the two GND terminals next to it. DO NOT connect USB power to the Raspberry Pi power port. To connect 24/12V Pneumatic Valves or other 24/12V props, connect the positive side of the power supply terminal to the positive side of the valve and then connect the negative side of the valve to the Output on the PiFace in this manner:


Diode Standard 1000V (1kV) 1A Through Hole DO-41


Input

The input terminals are basic contact closure inputs not for power driving inputs. They are internally pulled up to approximately 4.5 volts. To connect a standard switch you can simply connect one wire to the input pin and the other wire to the ground. To connect sensors and other non-5 volt input devices, you will need a Voltage Divider or Opto-Isolator circuit.

Tribute Show: “Neil Diamond – The Man, The Music”

Craig Stewart’s new amazing Neil Diamond Tribute Show: Neil Diamond – The Man, The Music.

Over two hours of Neil Diamond hits, synchronised with multiple projections and lighting.

Available for shows throughout Australia and beyond.

For more information contact craig@craigstewart.com.au or neildiamondthemanthemusic@hotmail.com

VenueMagic 2.6 Officially Released!

VenueMagic 2.6 Officially Released!

Thursday, 23 January 2014 16:23 | Written by Ben Holmes |  |  |

With special thanks to all of you who have worked so hard to help us test this new version of VenueMagic, we’re proud to announce the official release of VenueMagic 2.6.  We’ve added several new features that make VenueMagic more powerful than ever.  For a complete list of new features, click “Read More”.


New Features in VenueMagic 2.6


Important Note: Because of significant improvements made in VenueMagic 2.6, the old “Check for Updates” function will no longer work with older versions of VenueMagic.  You must download and install VenueMagic from links below.


New Features:


Scripts

Scripts are plug-ins that add features and capabilities to VenueMagic. Scripts may include:

• Macros for automatically configuring a project or timeline.

• Interfaces to hardware provided by other manufacturers.

• Special real-time playback effects.

• Keys to unlock additional VenueMagic features.

• Special customized functions.

Future versions of VenueMagic will allow users to create their own scripts using a built editor. For now, scripts are available for download only from the VenueMagic website.  More information on this will follow.


Monitor DMX Output Window

DMX output may now be monitored in a row-column format similar to the Monitor DMX Input window. The DMX Output Window also includes a new command line interface for DMX control.  DMX Command Interface allow you to Control DMX output manually using a simple command interface. Ideal for setup and debugging of DMX fixtures arrangements.


Precision Playback

The new Precision Playback Mode allows you to control lighting with a much higher degree of precision (30 fps +/- 2 ms).

(Not available in VenueMagic Express or Classic).


Audio Device Setup

The Audio tab of the Setup Devices window now allows more flexibility and features for setting up multi-audio outputs (not available in VenueMagic Express or Classic).


New DMX Devices Supported

VenueMagic has added support for the following DMX devices (not available in VenueMagic Express):

• Enttec USB Pro Mk2 (DMX only, MIDI not currently supported).

• DMXKing ultraDMX Pro (Note DMX2+AV or SC2+ editions required for 2-universe support).


Changes to Adjust Envelope Window

The Adjust Envelope Window now includes the additional settings:

• Gain center – specifies a center point for raising and lowering gain.

• Smoothing filter now allows separate settings for rising and falling edges of envelope waveform.

Also added was the ability to import and export presets for sharing with other projects.


Cue List Column Settings

You can now specify which time columns are displayed in the Cue List window, as well as the format for the time (Secs, Mins:Secs, Hours:Mins:Secs, SMPTE and Measure/Beat.


Follow Merge Type

The new Follow merge type lets you setup an output channel to shadow another output channel.


Improved Lamp Chaser Time Scaling

An additional time scaling parameter was added to Lamp chasers to provide more flexibility when using the Beat Tapper to control chaser speed.


Edge Snap Override

Temporarily override the clip edge snap feature by holding down SHIFT key while dragging clips.


Override Merge Mode

The Override merge mode is now available in track channel settings. This allows a track to completely take over an output channel during playback rather than merge it with other tracks.


No Trigger Events

Events in the Event Table now have a “no trigger” mode that can be used for events that are only activated by an Event Table Event.


Track Lock Security

Greater security flexibility was added to the track locking feature, including:

• Track passwords.

• Optionally allow sliding/sizing or property/envelope editing in locked tracks.


Foreground Playback Levels

Increased number of foreground playback levels from 10 to 20.


Custom Chasers Stored in Project

You are no longer required to copy the VMLib.dat file when moving a project to a different computer in order to keep custom chasers. A duplicate of custom chaser sequences is now saved in the project file.


Additional Fixes

• Fixed freezing of timeline videos played by playlist.

• Fixed incorrect DMX input addresses in Select External control window.

• Serial devices can now output (but not input) [$00] character.

• Fixed problems associated with deleting and modifying variable table variables.

• Fixed “jerkiness” problem with real-time recording of multiple (>1) channels into level control.

• Lamp Calibration Reset button now sets Ease in/out to 100 rather than zero.

• Fixed Telnet server login problem.

• Fixed 2-Universe Artnet problem in DMX2+AV and SC2+.

• Various crashes and lockups.

Last Updated (Thursday, 23 January 2014 16:50)

VenueMagic to be at IAAPA

The VenueMagic team will be on-hand at the IAAPA Attractions Expo Nov. 13th-16th at the Orange County Convention Center in Orlando, FL to demonstrate the esteemed VenueMagic line of Show Control software and debut new features and functionality!

You can find ESG/VenueMagic at Booth #967, where we will demonstrate the entire line of VenueMagic Show Control software: SC+, DMXAV, Classic, and Express as well as the VirtualDJ plugin with lighting, animatronics including a Skulltronix Skeleton (http://skulltronix.com), and computer interfaces such as VenueMagic’s own VM-DMXUSB-01 DMX interface.

Among the added features to be shown is VenueMagic’s new Yak Function. The Yak Function takes recorded audio and encodes a Yak track with animatronics gestures to make your creature come to life and talk! A Yak track can also be tweaked and edited to master the nuances of your character’s personality, and saved to a yak profile for later recall or for use of with new audio tracks!

Engineers will be on-hand to answer your programming questions and show you what is possible with VenueMagic controlling your audio, video, lighting, and animatronics.

So come visit us in sunny Orlando and see how VenueMagic makes your audio, video, lighting, and animatronics work in real-time.

For an appointment, contact our Vice President of Sales,

Barry Seiden:
biseiden@venuemagic.com

ScareCon Tradeshow May 10th

Teleprompter and Lyrics Release Now Available

This release contains a brand new Teleprompter and Lyric feature. This feature was added for those bands and performers who need to have the script or song lyrics in front of them as they perform. The lyric editor also fully supports importing Lyric(.lrc) files. This Teleprompter feature is available in DMX+AV, and SC+.Some additional features added in recent releases:


4 new “Special Chaser effects” – Bargraph, Comet, Flare, and Ping Pong – Rather than vary lamp levels over time, Special Chaser effects depend upon an “input level” to control the effect using an envelope or external control.In SC+, you can use Virtual Fixtures and envelope profiles to do some amazing effects with a minimum amount of effort.

DMX Recording – You now have the ability to trigger recording on an individual clip through various methods. You can now setup the recording based on your channel routing setup. Record one universe of DMX Data straight to disk (SC+ only). This will allow real time capture of DMX data from another console or application and put it into a format VenueMagic can easily use.

Professional YAK functionality – For the fledgling (and Pro) Animatronic programmers out there, SC+ now has the ability to save and import profiles. Profiles can be created from an Audio clip or a VenueMagic Track and imported as a clip into another track. Search the in-program help for “editing recorded data” for more information.

We have also changed the appearance settings to be more Black and Blue instead of Green and Teal. In order to get the new look you will need to delete the rmap1.vrm file from your “My Documents\VenueMagic\Application Data” folder. This file contains the customized color settings so if you have made any changes to the “Appearance Settings” you will need to remake those after you delete the file.


1 2 3 4
>